
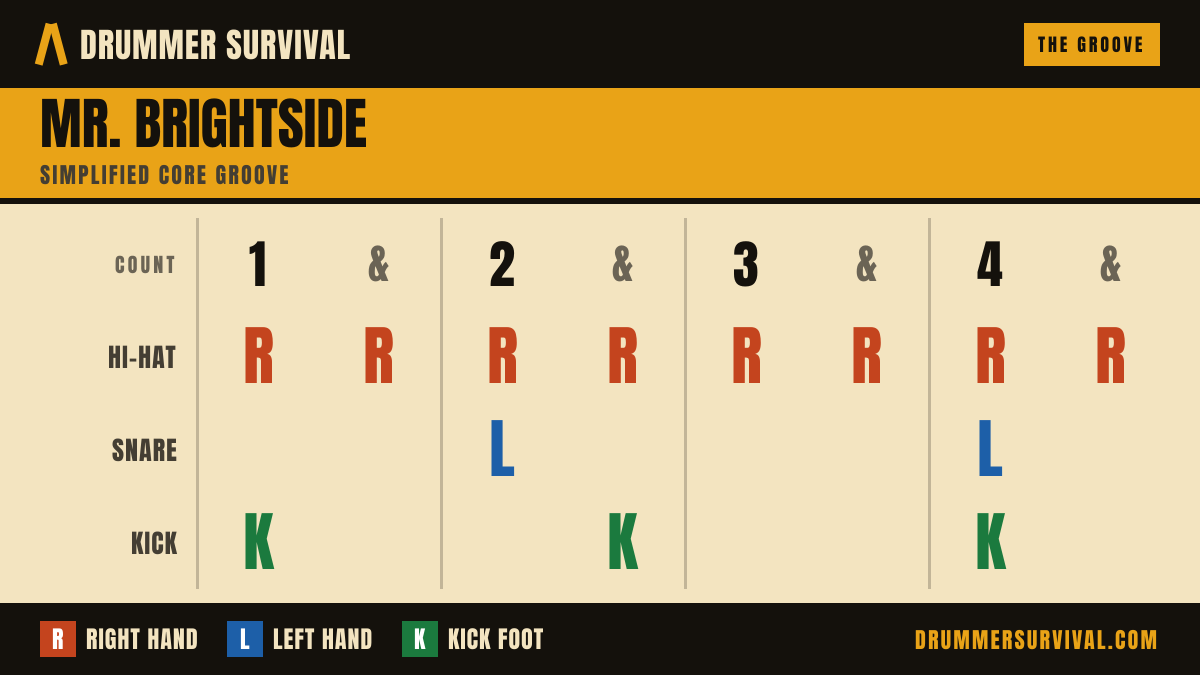
The drum part behind "Mr. Brightside" is a driving straight-eighth hi-hat pattern with the snare cracking on beats 2 and 4 and the kick adding push underneath. Nothing about the pattern itself is exotic — the challenge is holding it steady and controlled as the song builds. That's why it sits at a beginner-friendly difficulty: the groove is simple, but staying locked in for the whole song takes some reps.
The Core Groove
This is a simplified version of the beat you'll play through most of the song — right hand (or a foot on a hi-hat pedal) on steady eighth notes, snare on the backbeat, kick giving the groove its drive.
Start with just the hi-hat and snare. Once that backbeat feels automatic, add the kick pattern underneath. Play it slow — there's no speed you have to prove on your first pass. If the kick pattern trips up your hands, drop the tempo until it's clean, then build back up.
Mapping the Song
The song doesn't change drum patterns much — the drums mostly build in intensity rather than switching to a completely different beat. Here's how the sections generally break down for a drummer learning the part:
| Section | What the drums do | What to watch for |
|---|---|---|
| Intro | Sparse or hi-hat only, quieter dynamic | Don't come in too loud — save the energy for later |
| Verse | The core groove above, moderate volume | Keep the hi-hat even; this is where timing habits get set |
| Chorus | Same groove, played harder and fuller | Easy to speed up here — check yourself against a metronome |
| Bridge/build | Dynamics shift, energy rises toward the final chorus | Resist rushing as the song feels like it's speeding up |
This song doesn't require an exact BPM to learn — this page doesn't list one. Find the tempo by ear with a metronome app, then practice noticeably slower than the recording until the groove feels automatic. Speeding up is much easier than the reverse.
The Tricky Spot
For most beginners, the hard part isn't any single beat — it's the energy shift into the choruses. Your hands want to hit harder and faster at the same time, and the faster part is the problem. Practice playing the groove at two volumes — quiet and loud — at the exact same tempo before you try to match the recording's energy.
Fills
Keep any fill you add simple — four snare hits leading back into beat 1 is enough. The goal of a fill here is a clean landing on the downbeat of the next section, not a flashy pattern around the kit. If you lose the beat during a fill, that's a coordination and counting issue, not a sign you need a more complicated fill — a simpler one, played in time, will sound better.
A Practice Plan
- Loop just hi-hat and snare at a slow, comfortable tempo until it's boring-easy.
- Add the kick pattern at the same slow tempo.
- Practice the quiet-to-loud dynamic shift on the same groove, no tempo change.
- Add a simple four-hit fill going into a new section.
- Slowly bring the tempo up toward the recording's speed, one small step at a time.
A metronome-friendly practice pad is useful for drilling the sticking and dynamics away from the full kit, and if you're practicing at real volume in a shared space, ear plugs made for drummers let you play at full energy without doing damage to your hearing.
Common Mistakes
- Rushing the chorus because it feels like the song is speeding up (it usually isn't — you are).
- Playing everything at one volume instead of building from quiet to loud.
- Using a busy fill before the basic groove is steady.
- Skipping the slow-tempo phase and jumping straight to full speed.
Get the core groove locked at a slow, controlled tempo first. The dynamics and slight speed increase toward the choruses will come much more easily once the pattern itself doesn't need any thought.